
When I work with a Plastic Injection molding screw barrel, I see how its design shapes every part we make. Simulation studies show that even small changes in screw speed or compression zones can boost quality and efficiency. Whether I use a Twin Plastic Screw Barrel or run a Plastic Extrusion Production Line, the right Plastic Machine Screw Barrel makes all the difference.
Functions of the Plastic Injection molding screw barrel
When I look at the heart of any injection molding machine, I see the screw barrel doing all the heavy lifting. It’s not just a tube with a spinning screw inside. The design and operation of the screw barrel shape every step of the molding process. Let me break down its main functions and why each one matters so much.
Melting and Mixing of Polymers
The first thing that happens inside the screw barrel is the melting and mixing of plastic pellets. I pour the pellets into the hopper, and the screw starts to rotate inside the heated barrel. The barrel has different temperature zones, so the plastic heats up gradually. Most of the melting actually comes from the friction and pressure created by the screw rubbing against the pellets and the barrel wall. This process keeps the plastic from overheating and helps it melt evenly.
- The screw barrel contains a rotating helical screw inside a stationary barrel.
- Barrel heaters warm up the barrel before I start, so the polymer sticks and begins to melt.
- Once the screw rotates, most of the energy for melting comes from the shear between the screw and the barrel wall.
- The screw’s design, especially the way the channel depth gets smaller in the compression section, forces the unmelted plastic against the hot barrel wall. This maximizes melting and mixing.
- As the plastic moves forward, the melt pool grows until everything is melted. Continued shearing mixes the molten plastic even more.
I always pay attention to how well the plastic melts and mixes. If the melt isn’t uniform, I see problems like streaks or weak spots in the final parts. The screw barrel’s design, including its length, pitch, and channel depth, makes a huge difference in how well it melts and mixes different types of plastics.
Tip: Most of the drive power in the screw barrel—about 85-90%—goes into melting the plastic, not just moving it forward.
Conveying and Homogenization
Once the plastic starts to melt, the screw barrel takes on another important job: conveying the material forward and making sure it’s completely uniform. I think of this as the “quality control” zone inside the machine. The screw barrel is divided into three main sections, each with its own job:
| Screw Zone | Key Characteristics | Primary Functions |
|---|---|---|
| Feed Zone | Deepest channel, constant depth, 50-60% length | Transports solid pellets into barrel; begins preheating via friction and conduction; compacts material removing air pockets |
| Compression Zone | Gradually decreasing channel depth, 20-30% length | Melts plastic pellets; compresses material increasing pressure; removes air from melt |
| Metering Zone | Shallowest channel, constant depth, 20-30% length | Homogenizes melt temperature and composition; generates pressure for extrusion; controls flow rate |
I’ve noticed that the screw barrel’s geometry—like the pitch and depth of the screw flights—directly affects how well the plastic moves and mixes. Grooved barrels, for example, help keep the pressure steady and improve how much material I can process, even at high speeds. If I want to boost throughput, I might increase the screw pitch or use a larger feed opening. All these design tweaks help the screw barrel deliver a steady, uniform melt to the mold, which means fewer defects and more consistent parts.
- Barrel temperature control is critical for uniform melting and process efficiency.
- Multiple heating zones with gradually increasing temperatures toward the die reduce defects and improve cycle times.
- The screw’s configuration optimizes mixing and conveying efficiency.
Injection and Mold Filling
After the plastic is melted and mixed, the screw barrel gets ready for the big moment: injecting the molten plastic into the mold. Here’s how I see the process unfold:
- The screw barrel receives raw plastic pellets from the hopper.
- The screw rotates and moves forward inside the heated barrel, melting, mixing, and homogenizing the plastic.
- Mechanical shearing by the screw generates frictional heat, reducing the plastic’s viscosity so it can flow.
- The molten material collects at the front of the screw, forming a “shot” that’s just the right amount to fill the mold.
- The screw injects the molten shot at high pressure and speed into the mold cavity.
- The screw maintains packing pressure to make sure the mold fills completely and compensates for any shrinkage.
- After the mold fills, the screw retracts to get ready for the next cycle while the part cools.
I always watch the screw barrel’s performance during this stage. If the melt temperature or flow rate isn’t consistent, I get uneven mold filling or longer cycle times. The screw barrel’s efficiency in melting and moving plastic quickly helps me keep cycle times short and part quality high. That’s why I pay so much attention to the design and condition of the Plastic Injection molding screw barrel—it really does control the whole process from start to finish.
Screw Design and Its Impact on Molding Results
Matching Screw Geometry to Resin Types
When I choose a screw for my machine, I always think about the type of resin I plan to use. Not every screw works well with every plastic. Most shops use general-purpose screws, but I’ve seen how these can cause problems like uneven melting and black specks in the final product. That’s because some resins need special screw designs to avoid dead spots and keep the melt uniform.
- Barrier screws separate solid pellets from molten plastic, which helps melt the material faster and lowers energy use.
- Mixing sections, like Maddock or zig-zag mixers, make sure the melt temperature and color stay even, so I see fewer flow marks and weld lines.
- Some screw designs, like the CRD mixing screw, use elongational flow instead of shear. This keeps the polymer from breaking down and helps me avoid gels and color shifts.
Industry studies show that up to 80% of machines have resin degradation issues linked to screw design. I always match the screw geometry to the resin type to keep my parts strong and free from defects.
Effects on Melting, Mixing, and Output Quality
The screw’s geometry shapes how well the plastic melts, mixes, and flows. I’ve noticed that advanced screw designs, like barrier flights and mixing sections, push unmelted polymer closer to the barrel wall. This boosts shear heating and helps the melt become more uniform.
Here’s a quick look at how different screw geometries perform:
| Screw Geometry Type | Melting Efficiency | Mixing Effectiveness | Output Quality |
|---|---|---|---|
| Barrier Screw | High | Moderate | Good, if throughput is optimal |
| Three-Section Screw | Moderate | High | Very good with proper mixing |
| Maddock Mixer | Moderate | High | Best for color and temperature uniformity |
I always aim for a balance. If I push for higher throughput, I risk losing homogeneity. The right screw design in my Plastic Injection molding screw barrel helps me keep melt temperature steady, reduce defects, and deliver consistent parts every cycle.
Tip: I check melt quality by looking at color consistency and part strength. A well-designed screw makes this easy.
Material Selection for Plastic Injection molding screw barrel
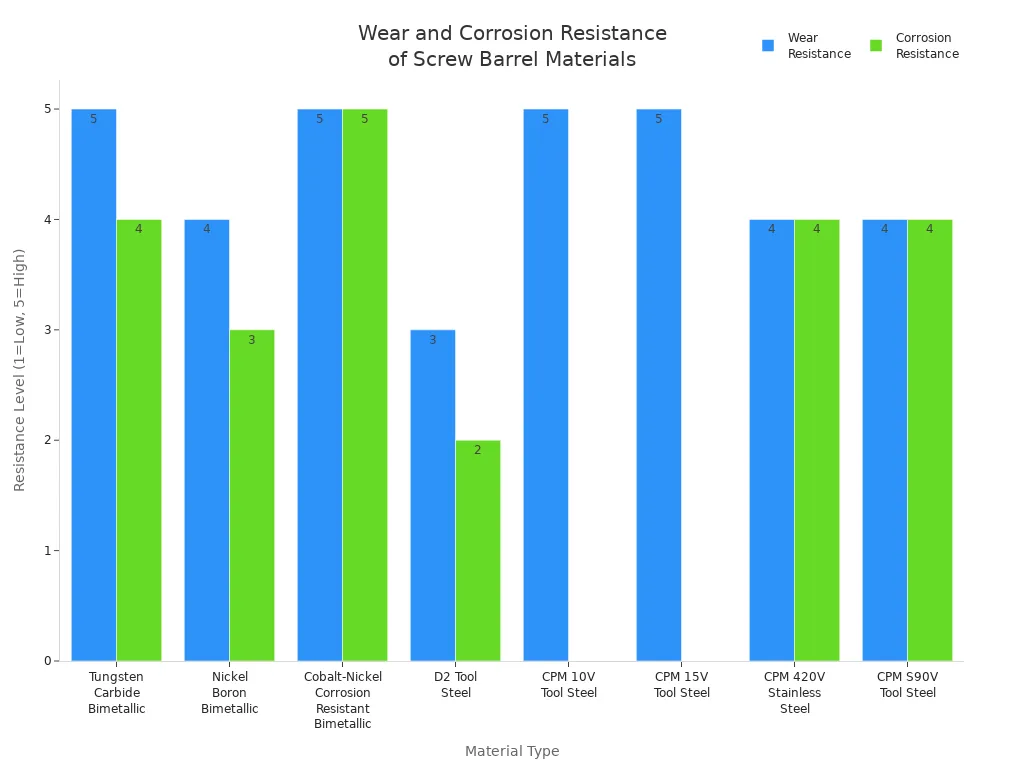
Wear and Corrosion Resistance
When I pick materials for a Plastic Injection molding screw barrel, I always think about how tough the job is. Some plastics have glass fibers or minerals that act like sandpaper, wearing down the screw and barrel fast. Others, like PVC or flame-retardant resins, can be very corrosive. I want my equipment to last, so I look for materials that stand up to both wear and corrosion.
Here’s a quick look at some common choices:
| Material Type | Wear Resistance | Corrosion Resistance | Best Use Case |
|---|---|---|---|
| Nitrided Steel | Good | Poor | Unfilled, non-corrosive resins |
| Bimetallic Barrels | Excellent | Excellent/Good | Filled, abrasive, or corrosive materials |
| Tool Steel (D2, CPM series) | High | Moderate/High | Glass/mineral filled or tough additives |
| Specialty Coated Barrels | Very High | High | Extreme wear/corrosion, aggressive resins |
I’ve seen that using bimetallic barrels or tool steels can extend the life of my equipment. These materials resist both scratching and chemical attack. When I use the right combination, I spend less time on repairs and more time making good parts.
Tip: If I process a lot of glass-filled or flame-retardant plastics, I always choose barrels with advanced coatings or bimetallic liners. This keeps my maintenance schedule predictable and my downtime low.
Choosing Materials for Specific Polymers and Additives
Every plastic has its own personality. Some are gentle, while others are rough on equipment. When I select materials for my screw and barrel, I match them to the plastics and additives I use most.
- Glass fibers and minerals chew up soft metals, so I go for hardened alloys or tungsten carbide coatings.
- Corrosive plastics, like PVC or fluoropolymers, need barrels made from nickel-based alloys or stainless steel.
- High-temperature resins can cause thermal fatigue, so I check that the screw and barrel expand at the same rate.
- If I use a lot of different materials, I sometimes pick modular screw designs. That way, I can swap out worn sections without replacing the whole screw.
I always talk to my resin supplier for advice. They know which materials work best with their plastics. By choosing the right materials, I keep my Plastic Injection molding screw barrel running smoothly and avoid surprise breakdowns.
Innovations in Plastic Injection molding screw barrel Technology
Advanced Coatings and Surface Treatments
I’ve seen how advanced coatings and surface treatments can make a huge difference in how long my screw barrels last. When I use barrels with bimetallic linings or tungsten carbide coatings, I notice less wear and fewer breakdowns. These coatings help the barrel resist abrasion and corrosion, even when I run tough materials like glass-filled resins. Some coatings use nano-materials, which help with heat dissipation and keep the process stable. I also like that these treatments reduce metal-to-metal contact, so the screw and barrel don’t grind each other down as quickly.
Here’s what I look for in advanced coatings:
- Wear-resistant alloys that match the materials I process
- Surface treatments that handle high temperatures and aggressive chemicals
- Coatings that keep the process stable and reduce downtime
When I pick the right coating, I spend less time on maintenance and more time making good parts. Metallurgical expertise really matters here. The right combination of alloy and coating can double or even triple the service life of my equipment.
Custom Designs for Specialized Applications
Sometimes, I need more than just a standard screw barrel. Custom designs help me solve unique molding challenges. For example, I’ve used conical twin screw barrels to improve mixing and thermal management. I’ve also seen custom screws designed to speed up cycle times, improve melt quality, and reduce over-shearing.
Some options I consider for custom designs:
- Screws and barrels made from special steels like D2 Tool Steel or CPM grades
- Surface hardenings like Stellite or Colmonoy for extra durability
- Barrel linings tailored for specific materials, like nickel base with carbide for glass-filled polymers
- Custom valve assemblies and end caps with advanced coatings
Custom solutions let me match my equipment to the exact needs of my process. This means better part quality, faster cycles, and less downtime. I always work with a design team that understands my application and can deliver high-quality craftsmanship.
Identifying and Troubleshooting Screw Barrel Issues
Common Signs of Wear or Failure
When I run my machines, I always keep an eye out for early warning signs that something’s wrong with the screw barrel. Spotting these issues early helps me avoid bigger problems later. Here are some things I watch for:
- Material leaking around the barrel, which usually means worn seals or too much clearance.
- Parts coming out with inconsistent sizes or black specks—these often point to poor mixing or contamination.
- Higher operating temperatures, sometimes caused by friction or carbon buildup inside the barrel.
- Strange noises or vibrations during operation. These can mean misalignment, broken bearings, or even a foreign object inside.
- Pressure spikes or poor melt flow, which make it hard to fill the mold properly.
- Blockages or material buildup inside the barrel, leading to downtime and bad parts.
- Color mixing problems or contamination, often from leftover material or bad temperature control.
- Visible corrosion or pitting, especially if I run corrosive resins.
- Worn screw flights or barrel lining, which I see more often when using abrasive fillers like glass fiber.
- Slower melting, more scrap, and longer cycle times as the equipment wears down.
If I notice any of these signs, I know it’s time to check the screw barrel before things get worse.
Practical Troubleshooting and Maintenance Tips
To keep my machines running smoothly, I follow a regular maintenance routine. Here’s what works best for me:
- I use only the lubricants recommended by the manufacturer.
- I check hydraulic oil levels every day and replace the oil on schedule.
- I watch the oil temperature and never let it get too hot.
- I inspect hoses, pumps, and valves for leaks or wear.
- I clean and tighten heater bands every month.
- I use thermal imaging to spot heating problems early.
- I monitor cycle times, scrap rates, and energy use to catch issues before they grow.
- I regularly clean the screw and barrel to prevent buildup.
- I make sure the screw stays straight and aligned during installation.
- I train my team to spot early signs of wear and keep processing conditions steady.
Staying on top of these tasks helps me avoid breakdowns and keeps my production line efficient.
When I focus on the science behind the Plastic Injection molding screw barrel, I see real results. I get better parts, faster cycles, and less downtime.
- Lower maintenance costs
- Improved product quality
- Longer equipment life
Staying sharp with screw barrel science keeps my manufacturing reliable and efficient.
FAQ
What signs tell me my screw barrel needs replacement?
I notice more black specks, uneven parts, or strange noises. If I see these, I check the screw barrel for wear or damage right away.
How often should I clean my screw barrel?
I clean my screw barrel after every material change. For regular runs, I check and clean it at least once a week to prevent buildup.
Can I use one screw barrel for all types of plastics?
- I avoid using one screw barrel for every plastic.
- Some plastics need special materials or coatings to prevent wear or corrosion.

Post time: Aug-20-2025